Tuesday, July 24, 2012

FINA Online (using Firebird 2.5 with zebedee 2.5.3)

I am developing an Accounting software (known as FINA at PT. Integritas Makmur Mandiri) using Firebird 2.5 and zebedee 2.5.3 to make an online application.

There are 4 option to using FINA with online database ( through internet ) :
  1. Make a straight connection using an Public IP without forwarding service.
  2. Make a straight connection using an Public IP with forwarding service at router level.
  3. Using a tunnel (zebedee) without forwarding service.
  4. Using a tunnel (zebedee) with  forwarding service at router level.
For Option 1 : 
  • just make sure your Public IP is valid, and just connect to it like you are on the same LAN of the server computer.

For Option 2 :
  • Open your "firebird.conf", usually located at your Firebird folder.
  • Set the option of RemoteAuxPort to any port that you allowed for port communication. Remove the # symbol at the prefix of the line. Example : RemoteAuxPort=3053
  • Start / Restart your FBServer (you can find it at service page of windows).
  • Go To your forwarding application (router), make 2 rule for incoming connection 
    • from port 3051 to your server at port 3051 
    • from 3053 (RemoteAuxPort) to your server at port 3053
  • Open your FINA client (with different internet connection).
  • Select "Open Database", then
    • Fill "File Name" with the path to your database at server computer.
    • UnCheck the "Via Internet" checkbox.
    • Fill "Located in :" with your Public IP
  • Hit "OK" button, then login to your database.

For Option 3 :
  • Make sure you start Zebedee server at server computer. You can find this file at \\FINA_installation_folder\AnyWhereServer.zbd. To Start it just double click at this file.
  • Make sure your fbServer already started too.
  • Now, open your FINA Client (with different internet connection), then select "Open Database".
    • Fill "File Name" with the path to your database at server computer.
    • Check the "Via Internet" checkbox.
    • Fill "Located in :" with your Public IP
  • Hit "Ok" Button.
  • Is the login form come up?
    • Yes -> then continue to login to your database.
    • No -> Follow the next step
  • Open windows task manager, go to "Processes" tab, try to find "zebedee" process, if exist then end the process
  • Open yours regedit at \Hkey_local_machine\Software\Imamatek\FnaEE\Database. Modified the value of key "AutoCreateZBD" to 0
  • Modified "AnyWhereClient.zbd" (located at same folder of FINA.exe), make sure there are lines of :
    • verbosity 0
    • server false
    • detached True
    • tunnel 3052:222.444.4.199:3051
    • logfile '.client.log'
  • Change "222.444.4.199" with your public ip, then save the file.
  • Double Click at this file to start zebedee client service.
  • Open yours FINA client (with different internet connection) then continue with the "Open Database" step, it shall be able to connect to your server.
  • Make sure to start Zebedee client manually before you connect your FINA with Zebedee.

For Option 4 :
  • Go To your forwarding application (router), make rule for incoming connection from port 11965 to your server at port 11965 too.
  • Follow the rest of Option 3 steps.

Any further or question, just leave the comment for this post or please send me an email, i will try to reply it as soon as possible.

Thanks.

    Sharing Printer as Local Printer

    Sometime printing job from sharing printer can make frustation. If you ever met these condition :

    1. Print with local printer smoothly, but can not print from the same printer as sharing printer.
    2. Your 3rd software cannot print using your sharing printer.

    You can to do this :

    For Windows XP :

    1. Click Start -> Printers and Faxes -> Add a Printer on the left panel -> click Next
    2. Select Local printer attached to this computer and click Next.
    3. Select Create a new port, make sure you select Local Port for the Port Type -> click Next
    4. At Port Name, just input the network path to the printer with this format :
      \\Computer_Name_Or_IP_Address\Sharing_Printer_Name
      Example : \\MyPc\FujiXerox M205 b” or “\\192.168.1.100\ FujiXerox M205 b
    5. Do you have the printer driver?
      • Yes -> Just hit "Have Disk" button, then navigate to the printer driver file, usually have an extension of *.inf.
      • No -> Select the printer Manufacturer (usually the name of your printer vendor) and select the printer type ar the right panel. (If the same type not listed, just try the closest model number or a generic manufacture and printer type)
    6. Klik Ok, wait for a couple second for Windows to find the shared printer.
    7. Follow the rest of the wizard step until it finish.
    8. Try to print with this new local printer, it shall print smoothly even the physical printer is located as sharing printer.
    For other version of windows, just change the step 1 and 2.

    For Windows Vista :
      1. Click Start -> Control Panel -> Printers -> double click for "Add Printer"
      2. Select "Add Local Printer" then click Next.
      3. Follow the rest step of windows XP.

    For Windows 7 :
      1. Click Start -> Devices and Printers -> click "Add a Printer"
      2. Select "Add Local Printer" then click Next.
      3. Follow the rest step of windows XP.

    Hope it can help to solved the sharing printer driver problem.

    Wednesday, April 11, 2012

    Apple ID without Credit Card

    If you ever need to create AppleID without credit card information, here the step :

    1. Make sure your iDevice not sign in with any apple id, you can check this at 'Settings'->'Store'. If exists, just sign out, by clicking the appleID, and choose sign out.

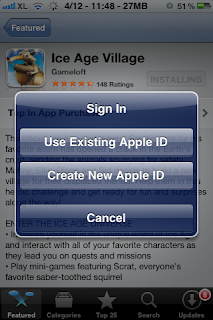
    2. Go to 'App Store', find any application that free then hit the 'Free' button, then 'Install App' button. After that app store will show some option of the Apple ID to used. Select 'Create New Apple ID'.


    3. Fill all the required information fields, and when you encounter this form, make sure you select 'None'


    4. After that, go to your email inbox, klik the link that Apple sent you in order to verified your email address.
    5. Done.


    Sometime we need to create this kind of Apple ID, in order to make sure that our credit card not get charged by accidentally.

    Fix Installous 4.4.2 download folder

    When i try to download iap (application) from installous 4.4.2 ( using iPad2 and running ios 5.0.1 ), it end up with strange behavior. Usually after i click download link, installous will begin to download the file, and the iap files will be showed at the download section, including all the download information.

    But i got :


    When you click download, installous will still download the iap file, but after finish you will never see it at 'Downloaded' section of installous, so you cannot install it.

    <<--- Not suggest, i just got it from googling for 2 hours -->>
    To fix this you can used iFile to :

    1. move the iap file from /var/mobile/library/Downloads to /var/mobile/Documents/Installous/Downloads
    2. Reopen your installous, then the application will appear at 'Downloaded' section.

    If you want to keep doing this for all the iap files that you download, it will waste your time and seem not very comfortable way to get the application via installous, also not many iDevice user familiar with cut-n-paste file inside iDevice directory.

    Here the final solution to fix this unusual behavior of installous :

    1. Open your Cydia, go to Manage->Packages (for iPhone/iPod) or Installed (for iPad), find 'Safari Download Plug-in'
    2. Klik Modify then Remove it.
    3. Reopen your installous, then try to download some application.

    My final conclusion (sorry if i was wrong) is that 'Safari download plug in' is not compatible with installous 4.4.2 and ios 5.0.1, hope it will get fixed soon.

    This solution also worked for ipod, iphone or ipad.

    Thanks.